
Flat-panel doors are prevalent, especially in older homes. They do the job, but let’s be honest, they don’t bring much to the space.
They can make your hallway or bedroom feel unfinished, even when the rest of your home looks updated.
You don’t need to tear them out or hire anyone to fix the problem. You can upgrade those plain doors yourself. It’s easier than you might think, and the change makes a big difference.
In this blog, you’ll find door style ideas, a full materials list, and a step-by-step guide. You’ll also get tips for closet doors, help with common issues, and information on budget-friendly supplies. Let’s fix those doors.
Why Update Instead of Replacing a Flat Panel Door?
Flat panel doors might not seem like a big deal at first, but they can change how your space feels. Swapping them out takes time, effort, and creates extra waste. You also lose the chance to build on what you already have.
When you update instead, you keep the frame, avoid hauling heavy doors, and still get a fresh look. You stay in control of the style, finish, and color. That means your updated doors can match your home better than store-bought ones ever could.
This choice isn’t just about saving, it’s about making what you have feel more like you.
Choose Your Door Makeover Style
You don’t have to stick to one look. Here are a few easy styles you can try:
- Shaker Style Panels: Add four simple rectangles for a classic, clean look.
- 3-Panel Vertical Layout: Break the door into three long panels to match modern trim styles.
- Modern Grid Design: Use square or small rectangular pieces for a more graphic layout.
- Beadboard Inserts: Add beadboard panels between the trim pieces for texture.
If you’re unsure, sketch a few styles directly on your door with painter’s tape. It helps you see what works.
Materials and Tools Checklist for Flat Panel Door
Before you start, make sure you have everything you need. Here’s a simple list to help you get ready. You’ll find most of these items at your local hardware store or online if needed.
Materials
- Trim or moulding (wood or PVC)
- Strong glue or construction adhesive
- Caulk (paintable)
- Paint and primer or a paint-and-primer mix
- Spackling or wood filler
- Sandpaper
Tools
- Miter saw, miter box, or miter shears
- Measuring tape and level
- Pencil and straight edge
- Paintbrush and roller
Beginner Alternatives
If you don’t want to cut wood:
- Use pre-cut moulding kits online
- Try adhesive moulding strips
- Look for peel-and-stick designs
Step-by-Step Tutorial Flat Panel Door
Once you’ve gathered your materials, it’s time to get started. Follow these steps one by one to update your doors. Each part is simple and can be done at your own pace.
Step 1: Measure and Plan Layout

Start by looking at your door and thinking about what design you want. Some people go with two large rectangles, while others use three or more panels. It depends on your style and how tall or wide your doors are.
Use a measuring tape to find the size of each section. Then mark your layout lightly with a pencil.
Try to keep the spacing even all around, about 4 to 5 inches from the door edges usually works well. Take your time here. A clear plan makes everything else easier.
Step 2: Cut Moulding

Now that you’ve marked the layout, it’s time to cut the moulding to fit your design. A miter saw or a miter box works great for clean angles. If you’re using PVC trim or want something easier, try miter shears; they’re safer and don’t need electricity.
Cut slowly and double-check each piece before moving on. If cutting feels too tricky, consider using pre-cut moulding kits. They save time and take out the guesswork.
Step 3: Attach Trim

Lay out all your cut trim pieces before gluing. This lets you check the fit one last time. Then, apply glue to the back of each piece. Press it onto the door and hold it for a few seconds.
You can use hot glue, wood glue, or construction adhesive. For extra hold, add small nails or use a nail gun, just make sure to press gently so you don’t dent the trim. Start with the longer sides and then do the top and bottom pieces.
Step 4: Sand and Fill Gaps
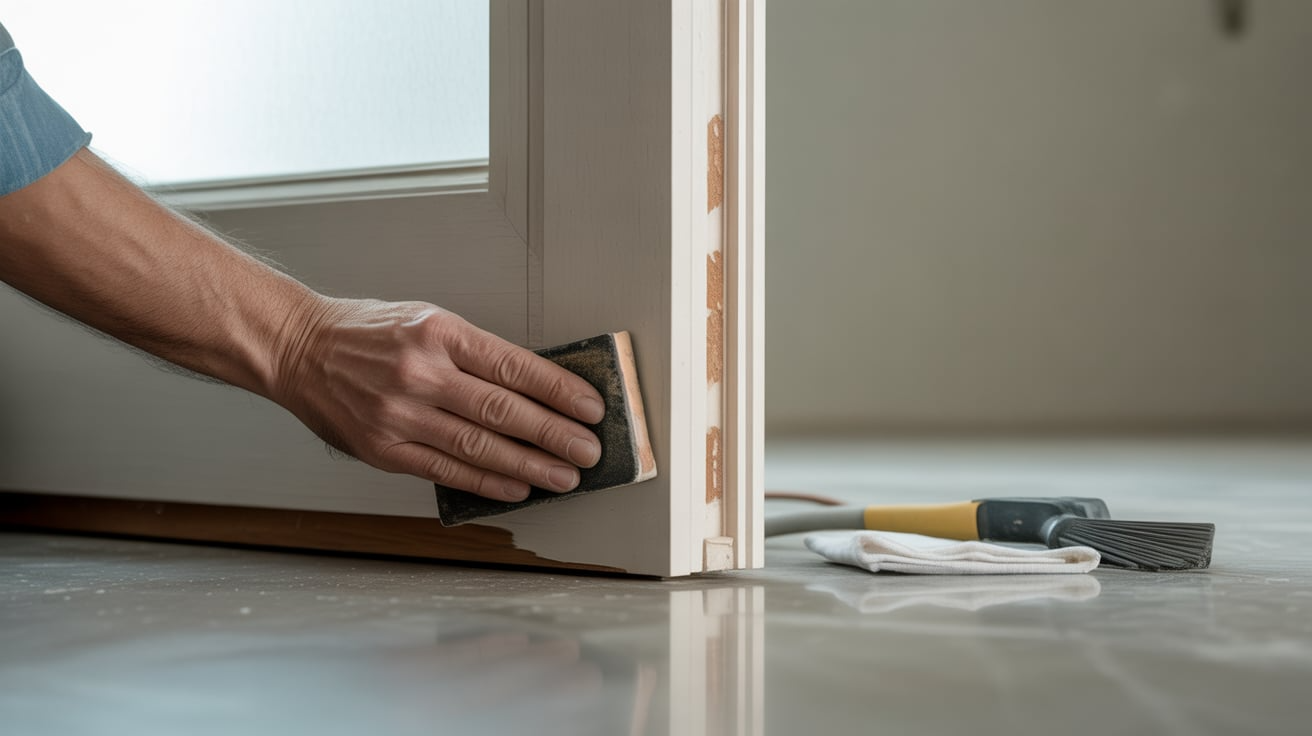
Once the trim is secure and dry, lightly sand around the edges. This helps remove any rough spots and makes the surface smooth for painting.
Use spackling or wood filler to cover small gaps or seams, especially in the corners. Let it dry fully, check that it changes color or feels firm. Then sand again until everything feels even.
Wipe the door with a dry cloth or vacuum brush to clear off any dust.
Step 5: Caulk Edges

Now it’s time to caulk the edges of the moulding. Use a thin line of paintable caulk where the trim meets the door. This step helps fill small cracks and makes the trim look like it belongs there.
Dip your finger in water and run it along the caulk to smooth it out. Keep a damp rag close in case you need to clean up extra. Let it dry before painting.
Step 6: Paint Tips and Color Ideas

You can paint before or after adding the moulding. If you paint first, touch up the edges later. If you paint after, use a brush for trim and a roller for the flat areas.
Choose a paint that includes primer if your doors aren’t glossy. For color, soft neutrals work well in most homes. Try white, beige, or gray. If you want something bold, deep green or navy can stand out in the right space.
Two coats are usually enough. Let the first one dry fully before starting the second.
Step 7: Add New Hardware

Swapping out old knobs and hinges is an easy final step. Pick a finish that matches the rest of your home, matte black, brushed nickel, or warm brass all work well.
Remove the old hardware with a screwdriver and use the same holes if you can. If you’re changing the position, fill the old holes with wood filler before painting. The new hardware helps bring the whole door update together.
Tips for Sliding or Bi-Fold Closet Doors
You can use this method for closet doors, too, but keep these things in mind:
- Don’t use thick moulding, as it can block the doors from sliding or folding.
- Trim pieces should be flat and light.
- Avoid heavy paint layers near the edges, or the doors might stick.
If the doors don’t close right after painting, sand the edges lightly.
Where to Buy
You don’t need to spend a lot. Here’s where you can find deals:
- Home Depot: In-store and online for trim, glue, and tools
- Amazon: Door knob sets, trim kits, and hot glue guns
- Etsy: Some sellers offer made-to-order moulding kits
Stick to basic materials unless you’re going for a specialty look.
Troubleshooting Flat Panel Doors
Small problems can show up during any DIY project. These quick tips will help you fix common issues with ease and keep your doors looking clean and polished.
1. Fixing Crooked Trim
It’s easy for trim to shift while you’re gluing or nailing. That’s why it’s important to use a level for each piece. Check both vertically and horizontally to make sure the trim lines up straight.
If something looks off after it’s stuck down, don’t panic. Gently remove the piece, wipe away any glue, and put it back in the right spot. If the glue has already dried, sand off the residue before reapplying.
Work slowly during this step and double-check each section before moving to the next one.
2. Filling Wide Gaps
Not every corner will fit together perfectly. If you notice wide spaces where your trim meets, especially at mitered corners, don’t worry. This is easy to fix.
Use wood filler or spackling to close the gap. Apply it with a putty knife and let it dry completely. Once dry, sand the area lightly until it feels smooth to the touch. After painting, the filled spots should blend in nicely.
Caulk can also help where the trim meets the door. Keep your line neat and smooth it out with your finger or a tool.
3. Paint Adhesion Issues
Paint may not stick well to some door surfaces, especially if the original finish is slick or glossy. If your doors feel shiny or slippery, light sanding or using a liquid deglosser will help the paint grip better.
Wipe down the surface after sanding to remove dust. Then apply a coat of primer or use paint that includes primer.
Avoid rushing this part; let each layer dry fully before adding the next. Doing this right means your paint won’t peel or chip later on.
Final Thoughts
Flat panel door makeover isn’t a difficult task if you follow the steps correctly.
Making simple changes to your doors can really clean up your space and make it feel more finished.
Swapping out hardware or picking a new style doesn’t take much, but it gives you more control over how your home looks.
You’re not just fixing up a door, you’re adding your own style and making your home feel more like you. These kinds of updates are easy to do and still make a big difference.
If this gave you some good ideas, there’s more where that came from. Check out our other posts for easy, low-cost ways to improve your home.